Crafting has certainly reached new heights in the last decade with the internet--I love it! I've learned so many great tips and tricks for anything craft-related and now I get to pass along a great FREE class to our Mashed Potatoes and Crafts.com readers.
Craftsy.com is an incredible site with classes on everything from cooking, sewing, to fine-art instruction. It's your lucky day because I have a free class for you plus another offered at 50% off.
Modern Buttercreamis taught by Joshua John Russell.
This class teaches how to cut, level, fill and crumbcoat layers like a
professional, then add simple fondant and piped accents.
I'm telling you that this class is definitely spot-on with Adri's interests--she's the wedding planner who is the central character in my new mystery series (coming soon by Rachelle J. Christensen!). So click on over to the Modern Buttercream class:http://www.craftsy.com/ext/MPAC_ModernButtercream
and while you're there check out the other fantastic classes offered for every kind of crafter!
Today I'm going to do a quick tutorial that I saw here and decided to try and of course tweak! I added a plaque and used happy colors!
The Refreshing Summertime Wreath!
What you need:
12" Styrofoam wreath form
Ruler
Scissors
18 yards of 7/8" grosgrain ribbon
Raffia
1. Cut the ribbon into 14 inch sections. I used a long ruler and put a piece of tape on the 14" mark to make it easy to remember.
2. Tie the ribbon onto the wreath and scoot them close together.
3. Tie the raffia on to wreath to hang it and set aside.
The Welcome Plaque
What you will need:
White acrylic paint
A wooden plaque
paint brush
letters
decoupage (to seal the plaque)
1. Paint plaque white and let dry. I rubbed mine with a bit of sand paper after to give it a weathered look.
2. Glue letters onto plaque
3. Seal with decoupage.
4. To apply it to the wreath I hot glued it like crazy to make it stay.
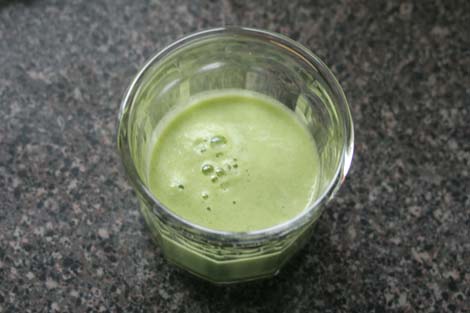
Kate here again with another recipe. My sister in-law gave me a recipe for a Pineapple-Spinach Drink. Since I like to make smoothies for breakfast with a fruit base, I changed the ingredients from juice to real fruit. It's easy, delicious and that spinach is oh so good for you; so go ahead and try it.
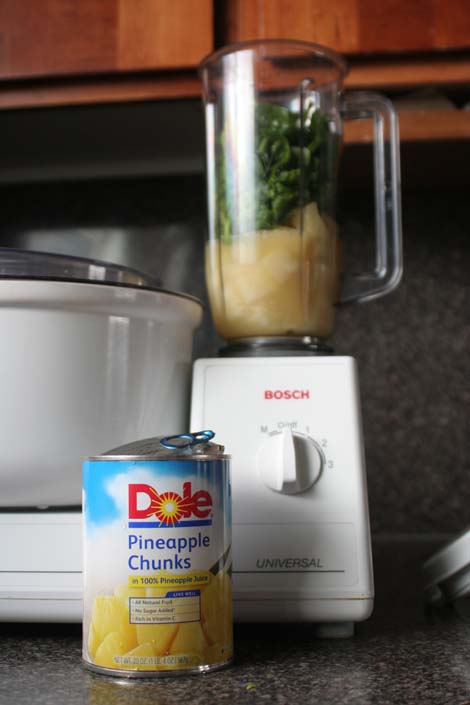
Two cans of chunk pineapple (you can use crushed) and some fresh spinach. I pulled mine out of one of the five large bowls of the stuff in my fridge. Don't worry--there's more in the garden. I won't run out any time soon.
(After I took this picture, I discovered that it's actually better to put the spinach in the blender first, and then pour in the pineapple chunks. The juice runs down to the bottom of the blender so there is plenty of liquid to get started. Then you don't have to stop the blender a couple times and push the spinach down because the pineapple chunks do that for you.)
Put one can of pineapple in the blender with the spinach and blend until the spinach is only tiny green flecks. Add the second can of pineapple and blend until the green flecks are gone. Pour into a pitcher. You can add water to thin it if you want. I had some orange juice so I stirred that in, too. It's perfectly all right not to add any other liquid.
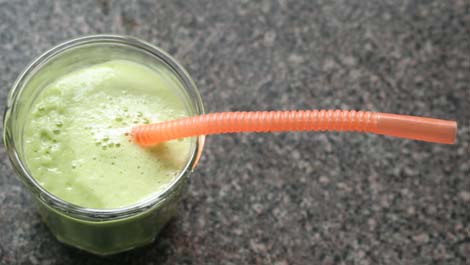
I found these straws at our local grocery store. They are perfect for little cowboys and cowgirls.
Pineapple Spinach Smoothie
2 cans chunk pineapple (or crushed)
Some spinach
Orange juice or water if desired
Blend pineapple and spinach until green flecks are gone. Stir in chilled orange juice. When I'm thinking ahead, I put the cans of pineapple in the fridge the night before so the smoothie is cold in the morning. When I'm not thinking ahead, I throw some ice cubes in the blender to "chill" the smoothie. Enjoy!
We might have had a little fun at our house the other day...
Painting lots of little fingernails and toenails in preparation for the 4th of July. I thought I'd share some photos and tips for painting kid's nails so you can enjoy those smiles!
My girls were so excited. I told them we'd better take some pictures to share their creativity spark.
My 10 year old inspired my tiny paintbrush to create flags for our wonderful U S of A. We painted her toes a base of white, then I used an art deco nail paint--the kind that has a really skinny brush--and added the stripes. Finally I used Blue polish for the flag and then dotted white with the tip of the nail polish brush for stars.
My 7 year old was so excited for the "fireworks" on her nails.
A few tips for painting kid's nails
Paint about thirty minutes before bedtime. This allows the paint to dry and then gives them overnight for it to cure so that it won't smudge so easily.
Always take the tip of the paintbrush and swipe the very edge of the nail. This seals the coat and prevents chipping.
Allow time to dry in between coats and use a top coat protector.
Glitter ALWAYS lasts longer and we like to use a bit of glitter to top off a solid coat of color.
Use a Q-tip dipped in nail polish remover to clean up edges of nail beds
Work in the bathroom, so if there are spills they will hopefully be able to clean up!
Hope these tips help and that you have a wonderful Independence Day!
How do you make them?
Core your apple, slice it in about 1/4 inch rings. Next spread with Hazelnut chocolate spread (Nuttella) and add a few sprinkles. My kids loved their donuts and I let them each have two! I figured even with two they didn't get a full serving of Nuttella (which still has plenty of sugar, so go easy!)
What other ideas do you have that substitute treats loaded with refined sugars and carbs? I'd love to hear them!
Today the Mashed Potatoes and Crafts site is featured over at Sugar Bee Crafts as part of the rockin' Red, White, and Blue series! Be sure to visit Mandy's amazing site and check out the roundup of fabulous posts on everything your heart desires.
So how does laundry detergent tie into the Red, White, and Blue theme? It's summertime--the season of BBQ stains in the form of red ketchup and blue popsicles and I want to show you how to keep your summer whites looking great!
For over a year now, I've been using my own homemade powdered laundry detergent. I began studying the best recipes/methods so that I could save money and what I found in the process is that I could cut down on a lot of the added chemicals in store-bought laundry detergent. I'm working on improving that further but I'm pleased with my recipe.
I created a video tutorial that is just over five minutes long that you can watch for step by step instructions.
I'm also including the recipe and instructions here.
1 ( 3lb) Container OXY clean (you
can adjust this amount to your preference. I use a little less.)
2 bars soap grated—one Fels Naptha, one
hotel soap (free!) or other favorite soap
1 (2lb) Boxes Baking Soda
1 Bottle Downy Unstopable Scent
Booster
Use a large bucket to mix all ingredients together. Just dump the boxes into the bucket. I recommend doing the mixing outside to avoid inhaling soap powder.
Use a fine cheese grater to grate your soap. *Great tip for easy grating. Put your bar of soap in the microwave for 6-7 seconds. This will soften it just enough to make it much easier to grate the soap.
Use a large wooden spoon to stir all of the ingredients together, making sure that your soap flakes are blended well.
That's it! You're ready to wash. Test out a few batches to gauge whether you'd like to use 1, 1 1/2, or 2 Tablespoons of laundry detergent. Don't be concerned if the water doesn't sud up like store-bought detergent. Your clothes are still getting clean!
Recommended use:
2 Tbsp each load for Super Capacity
top-load washer
1 Tbsp each load for Super Capacity
front-load high efficiency washer
1 Tbsp each load for Regular load size top-load washer 2 Teaspoons each load for Regular load size in front-load washer
I also created a short reminder video, just two minutes long when you're ready to mix up your first batch!
If you'd like some great tips on cleaning your washer to increase its cleaning capacity, check out my series on
25 Places You Didn't Know Were Dirty and How to Clean Them
What do you think? Are you ready to make your own homemade laundry detergent? Let me know in the comments what works for you or if you have any other great tips you'd like to add, please share!
Thanks for visiting Mashed Potatoes and Crafts. If you'd like to get to know me and the contributors a little better, visit our ABOUT page here http://www.mashedpotatoesandcrafts.com/p/about.html
Are you one of those moms who prefer to do it herself? Ah, I know you’re out there. You take it all on so you don’t have to redo or clean up someone else’s mess, right? I'm guessing you are also stressed out.
Here’s the thing, you can relieve your work loadandhave fun with your kids in the kitchen. “How?” you ask with a bemused look.
Take a little time to teach them simple skills.
Think of it this way: Give a kid a meal and you feed him for a day. Teach the kid to cook and you never have to feed them again.
(Okay, that might be a slight exaggeration.)
But think of it, if you taught him/her how to make one dinner you could have one night off a week. Teach each kid in your house how to make one meal and you could have several nights off a week. Hmmm, I hear the wheels turnin’.
It doesn’t have to be a 5-star meal. Simple chicken dishes can be a lifesaver and with all the easy-to-sprinkle flavor packets it’s easy-peasy to throw something together.
If your kids are too young to handle raw meat on their own or use the stove, have them make side dishes. They can stir things together, rip lettuce for a salad, and even mash potatoes. Just be sure to get them on the right level. Having to reach up and over the counter will make things too difficult for young ones and invite spills.
One thing I love about cooking with my kids is that they tend to open up while their hands are busy. Because I’m not staring into their beautiful eyes and wishing I had eyelashes as thick as theirs, they relax and share things about their day. (It’s when I learn their secrets.) It’s also when I give them little pointers about holding a cutting knife or the speed of the hand mixer. It’s laid back because they are actually helping. It’s a great time to be together.
Here's a little info about Christina's new cookbook Young Chefs: Cooking Skills and Recipes for KidsYoung Chefs by Christina Dymock- Hey kids! It’s time to take
charge in the kitchen. Become a young chef as you make your favorite
foods and explore new recipes with everything from Game Day Hot Dogs to
Lemon Shark Bars. Each recipe tells your parents when help is needed and
also includes stories, jokes, and history about the recipes. You’ll be
whipping up masterpieces in no time. Let’s get cookin’!


 I found these straws at our local grocery store. They are perfect for little cowboys and cowgirls.


 Young Chefs by Christina Dymock- Hey kids! It’s time to take
charge in the kitchen. Become a young chef as you make your favorite
foods and explore new recipes with everything from Game Day Hot Dogs to
Lemon Shark Bars. Each recipe tells your parents when help is needed and
also includes stories, jokes, and history about the recipes. You’ll be
whipping up masterpieces in no time
Young Chefs by Christina Dymock- Hey kids! It’s time to take
charge in the kitchen. Become a young chef as you make your favorite
foods and explore new recipes with everything from Game Day Hot Dogs to
Lemon Shark Bars. Each recipe tells your parents when help is needed and
also includes stories, jokes, and history about the recipes. You’ll be
whipping up masterpieces in no time