Monday, October 27, 2014

DIY Minnie Mouse Costume


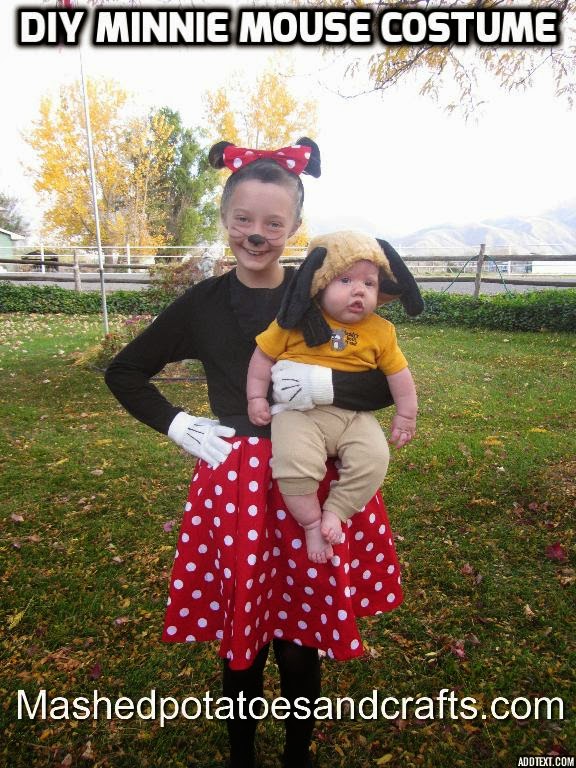
My cute daughter wanted to be Minnie Mouse for Halloween this year. I looked online and found a few costumes that weren't as cute as we were hoping for and way too expensive. She wanted to dress up as the vintage Minnie Mouse so with a long-sleeved black shirt we were on our way.

I made a pair of Minnie Mouse Gloves, you can see the quick tutorial here

http://www.mashedpotatoesandcrafts.com/2014/10/minnie-or-mickey-mouse-gloves-diy.html


I also made a darling Minnie Mouse Bow that stands up so nicely when clipped in her hair. For a step by step detailed tutorial click here

http://www.mashedpotatoesandcrafts.com/2014/10/minnie-mouse-bow-with-rounded-edges.html
And here I'll show you the finishing touches to this winning Halloween costume!
 This skirt was made from this perfect fabric from JoAnn's. This is a simple circle skirt AKA Poodle skirt that I adapted from this pattern over at Merricksart.com. I'm so glad I ran into my friend Tami at the fabric store because she told me to try this idea!

I bought some black 2 inch wide elastic band, measured my daughter using the handy dandy formula of waist/Pi 3.14/2= the half circle you need to measure and cut out of the folded fabric.

Then I stretched the elastic as I sewed along with a straight stitch. It took me less than five minutes to do this part and you can tell if you scrutinize my stitching, so don't cuz this is a Halloween costume, right? :)

I lucked out in that I was able to make this out of 45 inch fabric because we only needed it to be 17 inches long to the knee. I added a nice one inch hem and pressed that.


Of course we need some cute yellow shoes, we borrowed these from my sister-in-law who has tiny feet. :)


 For the tail, I just pinned on a tail from a cat costume. It is a wired tail so we could adjust it as needed.

What about ears? My daughter didn't want to wear the fake ears that often are somewhat floppy and in her words "childish" soooo, she thought of a great idea. I pulled my daughter's hair up into high pigtail buns. At least that's what I'm calling it. I just did two high ponytails and didn't pull the hair all the way through on the third go round with the elastic.
http://www.mashedpotatoesandcrafts.com/2014/10/minnie-mouse-bow-with-rounded-edges.html

With the hair standing up and nicely shaped like ears I used washable black hair spray and sprayed her entire head. Then I clipped the bow in her hair.
This is how it looked before.

And here is the complete Halloween costume with face paint, sprayed hair, gloves AND her baby brother as Pluto.
For more great craft ideas, check out the novel that features our site Diamond Rings Are Deadly Things

Minnie Mouse Bow with Rounded Edges, Easy DIY Costume

My daughter wanted to be Minnie Mouse for Halloween and we needed the perfect Minnie bow. I've posted the complete tutorial for the bow here. I also created a quick tutorial on how to make your own Minnie Mouse Gloves and this post to see how we put the costume together with a super simple skirt.

There are tons of patterns online for making cute hair bows but I couldn't find any that were like the large bow with rounded edges that Minnie wears, so I adapted a pattern to create just the look we wanted.


To make most bows like this, you just cut a square of fabric, but to get this larger size you want one side of your square bigger than the other. See the difference between the two bows below? I'm going to show you how to make the top one with a fuller, rounded edge.
I cut a piece of fabric 8 1/2 inches by 8 inches from this darling cotton fabric I found at JoAnn's Fabric.


Fold your square in half so that you will stitch the shorter sides together. Sew right sides together, turn out and press so seam is in the middle. See photo below.
Here's the part that is slightly different than your typical bow. Normally you'd just fold in the outer edge and stitch like the top piece in the photo below.


Instead you need to fold the edges in carefully so that your outer edge is rounded instead of straight. There's no real science to this--think curve. Just fold in a little more at the corners and a little less in the middle, making a nice scallop shape. It helps to press this with your iron and use a few pins to keep it in place.

Stitch along the outer edge with matching thread.

Now accordion fold the middle of the bow and pinch it together with your fingers.

You can hand stitch this, but I'm all for quick so I just put it under the presser foot and zigzagged across.

Now you need a piece of fabric that is 2x3 inches. I don't have step by step photos here. Just fold the 2x3 piece in half lengthwise and stitch right sides together.  Turn right side out and stitch the loop together to create the middle band for the bow.

Once that is complete, you can slide it onto your bow and adjust for tightness

Hot glue the hair clasp


Enjoy this delightful little bow. My Minnie Mouse sure was happy with how it turned out!
http://www.mashedpotatoesandcrafts.com/2014/10/diy-minnie-mouse-costume.html
Check out Diamond Rings Are Deadly Things and our site for more great craft ideas and tutorials!

Minnie or Mickey Mouse Gloves, DIY

In preparation for the cutest Minnie Mouse costume ever, I searched for just the right gloves for my pre-teen and couldn't find what we wanted so I decided to make them myself.

This project was much easier than I anticipated and turned out so cute.


All you need is a white pair of gloves (I got mine at JoAnn's Fabric for $1.00) and some black glitter glue. The glitter adds some fun sparkles to the black lines.

Lay the gloves out flat or alternately you can put the glove on your hand to apply the glue.
Put one strip of black in the middle and one slanted out on either side.

You'll see that the glitter glue looks pretty goopy here, but it will dry nicely overnight.

Here's the finished product. The glue absorbs into the material and makes a nice even line.

We didn't encounter any problems with cracking when she wore the gloves so I'm calling this a success!
http://www.mashedpotatoesandcrafts.com/2014/10/diy-minnie-mouse-costume.html
Next, check out this post to see how to make this simple and cute Minnie Mouse bow! And visit this post to see how to make the skirt and put together the entire costume.

Check out Diamond Rings Are Deadly Things for more fun craft projects!
 

Tuesday, October 21, 2014

Guest-Book Stones- Wedding Book Alternative


Guest-Book Stones- Chapter 29
  
Collect or purchase small river rocks (nothing larger than about
three inches in diameter) and arrange on a table beside permanent
markers (both black and lighter colors, such as silver).

Invite guests to sign the “Stepping-Stones to a Happy Marriage” with brief words of
advice. Present the bride and groom with a large (sturdy) glass container
filled with the guest-book stones.

Other options would be to present the stones in a basket, place stones around a flower garden, walkway, or patio.
Courtesy of www.mashedpotatoesandcrafts.com.

Learn more about Diamond Rings Are Deadly Things and all of the chapter tutorials here

Wednesday, October 1, 2014

It's that time, already!

Hello crafters!
Kristie from 
It's the first Wednesday of the month
and I'm back with a tutorial.
These last few months have been hectic,
so much going on and I took the summer off from 
doing craft tutorials here on 
Mashed Potatoes and Crafts,
but now I'm back and will be posting every month.
(Why not pop over to my blog and see what I've been up to)

I know it's just the beginning of October, but 
it's that time already!
Time to get started on Christmas cards.
Yes!  I said Christmas cards.  
If you are making your cards, you should get an early start
 so you don't have that hectic rush at the last minute.
I've got an easy card for you to make using scraps of Christmas paper.
And to make things even better, this is a technique you can use with any
type of paper, so it can be used for any holiday or occasion.
First thing you need to do is gather some coordinating papers
together.  You can see I have different shapes and sizes here, 
but they all have Christmas theme and colors that coordinate well.

Cut strips of all the papers.  They can be any length, but 
all should be the same width.
I cut all mine 1/2" wide.

You will be making a standard 5 1/2 x 4 1/4" card.
(But this can be done in whatever size you want.)
You will need a piece of white card stock cut to about that size.
You will be cutting it down to size later, so it can be a little larger or
 a little smaller than the card size.

Starting at one corner, begin gluing down the strips of paper at an
angle, leaving a small space between pieces (about 1/8")
Try to stagger the pieces as you go.

Continue gluing pieces in a random order.
I like to try not to have like pieces next to each other.

Continue this until the entire piece of card stock is covered.

Turn your piece over, it should look like this with odd pieces 
over the edges.

Now with a sharp scissors, cut the extra off all edges.

This is what your piece should look like.

Trim it to approximately 5 1/4" x 4"  and adhere it to 
the front of a standard 5 1/2" x 4 1/4" white card stock base.
You can see in the picture I trimmed off about 1/2" from the side 
of my card. 

Now we are ready for the sentiment.
I found this paper in my scrap stash and trimmed out
Merry Christmas.

If you have something like this, adhere it to a piece of white card stock
 and trimmed a narrow mat around it.
If you don't have a paper like this to use, you can stamp a greeting
or print something from your computer, or even hand write it.

Adhere that greeting to your card.
You can glue it directly to the front of the card
or, as I did, use foam tape to give a little more dimension.
Now you have a lovely card ready to send.
You can stamp a message inside or hand write a personal note.

This type of card can be made with any kind of papers.
You could use all plain colored papers, a combination of plain colors and
patterned papers.  Any type of patterned paper could be used,
How pretty would this be with some flowers and dots or stripes?
Look through your scraps and use your imagination
I'm sure you'll find some fun combinations.

Thanks for stopping by today,
I hope you've been inspired.
Now go get crafting!

Until next month, have fun crafting!