

We're so thankful for our family, our friends, a warm home, and plenty of good food.
We hope that you have a super smashing Thanksgiving and that you eat plenty of mashed potatoes!


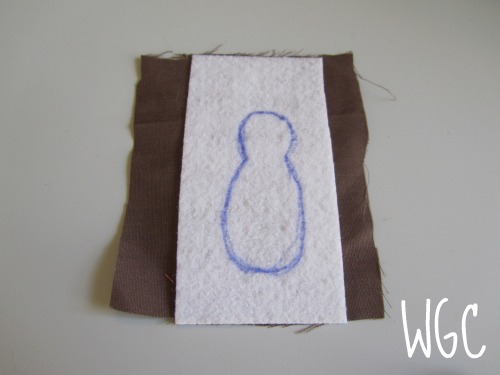

 2. I cut the ribbon in pink 3.5" x1, orange 3.5" x2 and 2.5" x2, and yellow 3.5" x2 and 2.5" x2 lengths. I looped them and hot glued them.
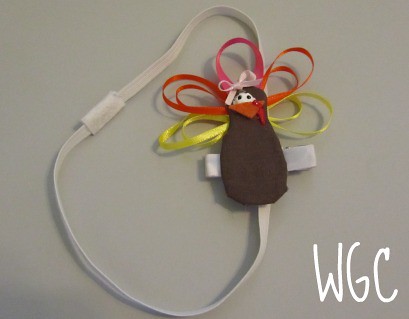


 Mix 2 cups flour and a 1/4 tsp. salt together. You'll also need 1 cup of shortening. I like butter flavored if I have it. Today I didn't. (I have tried substituting butter for the shortening with disastrous results--I'll let you know when I figure out a way not to use shortening. But for now . . . )
 Add the shortening to the flour mixture. Use a pastry blender to combine the flour and shortening. An electric beater works nicely if you don't have a pastry blender. You are trying to turn the flour into flour-shortening crumbs--so keep at it until the shortening and flour mixture are incorporated together.
 Now slowly drizzle ice-cold water over the mixture as you stir it with a spoon. Go easy on the water.
 This is done. I won't add anymore water. Divide the dough in half.
 Place half the dough between two sheets of plastic wrap and roll out quite thin.
 Peel back the top layer of plastic wrap. I have all kinds of helpers today owing to the fact that it's 4:30 on a fast Sunday. They're starving! Lift the crust off the counter and carefully flip and place in a pie dish.
 While I made the crust, my girls used the apple peeler, corer, slicer on about 20 very small apples.
 We've gone through all of our tart apples and are now left with these sweet things. Here is the key to using sweet apples in apple pie: lemon juice--and lots of it. Don't be shy about it.
 Stir in some sugar. How much is up to you, but I'll post a range at the end for anyone who's nervous without specifics.
 Add some nutmeg and...
 some cinnamon, and...
 some flour. Stir and taste it.
 It was still too sweet so we added more lemon juice...sure wish we had some Elstar apples left.
 Pour apples into waiting pie crust. Turns out 20 small apples was a few too many. No problem, the starving helpers finished off the leftovers before I finished the crust. Fast Sundays, with church ending at 4:00 and a Mom insisting we make dessert first so that maybe Dad will be home to join us for dinner when we sit down to eat, will do that to munchkins.
 Roll out the second half of dough in the same manner. Place the crust on top of the apples.
 Hold the pie plate in waiter-serving fashion with the hand that you don't write with. Use the back of a table knife to cut the two layers of crust even with the pie pan.
 You may have noticed the hole in the previous picture where the crusts didn't quite meet. This is not a time for panic. Pick up a piece of the crust you just cut off and place it over the hole like so. You'll see that I have two such places to mend. Pat the extra piece into place and trim the excess.
 Gently tap the crust until you can't see the mending line. (Or it's very faint.)
 There are a couple of ways to seal your two crusts together. This method is fast and easy. Check cookbooks for other methods. Pinch the crust all the way around.
 Poke the crust with a fork at regular intervals. This allows the steam to vent. Sometimes Nate will cut out cool designs in the top of the crust because he's pretty talented, but I just use a fork. Sprinkle with a good coating of sugar and bake. See, it's not so bad. Now you can eat dinner while the smell of a baking apple pie fills your house and makes it all warm and cozy.
 It's best to let your pie set up for and hour or two before you serve it. That never happens at our house. Top with whipped cream and enjoy the taste of fall.


