Monday, March 25, 2013

Save for Higher Education with IDeal

As many of you know, I was born and raised in Idaho. I think it's a great state and I loved my childhood. Now I love going back to visit that beautiful part of the country.
Idaho is the inspiration for this website and because I'm all about sharing great things, I wanted to tell you about a fabulous program to save for college. IDeal or the Idaho College Savings Program contacted me and with their help, my parents were able to set up a college savings account for each of my four children.

 The best part--my kids can use that money anywhere in the country. Each state has their own 529 plan and you must be a resident, which is why my parents set up the accounts for my kids. IDeal handled all the account setup which made this savings program a breeze!

What a wonderful way to support your grandchildren! As a college graduate, I can tell you that every dollar helps and this is a great idea to encourage your children to look to the future. I hope that each of my four children will have the opportunity to attend and graduate from college. I think education is vital to the future of our nation.
I invite you to visit the following link to
Learn more about IDeal and special benefits for Idaho taxpayers at www.idsaves.org.


Saving for Higher Education is Easy and Affordable with the IDeal – Idaho College Savings Program

 The pictures are of me with my four kids and my mom and dad--love those great Idaho people!

The IDeal Idaho College Savings Program (“IDeal”), offers an easy and affordable way to save for higher education.  IDeal is a great way for family and friends to invest in higher education and can be done by starting with as little as $25. IDeal also offers the ability for anyone to contribute to an existing account through Ugift® ─ Give College Savings. This simple online feature allows you to invite grandparents, parents, family and friends to celebrate special occasions and holidays with gift contributions to an IDeal account to help toward college education costs.

“IDeal is an excellent way for parents and families to financially prepare kids for college and start saving today, which is why I regularly contribute to my loved ones’ IDeal accounts,” said Idaho State Treasurer Ron G. Crane. 
The state-sponsored 529 plan is unique because money invested today can be used in the future on any qualified higher education expense, including tuition, mandatory fees, required books, supplies and equipment, and certain room and board expenses. Additionally, you can use IDeal contributions at any eligible 2- or 4-year college, vocational/technical school, or graduate school anywhere in the country – not just in Idaho. www.idsaves.org
 
Thanks to IDeal for this program and for the inspiration to get things started for my kids' college education!
 

Wednesday, March 20, 2013

Homemade Marshmallow Peeps

Jordan from Wayward Girls Crafts here! Easter is fast approaching and I was struck by inspiration for a craft:

I thought this would be 1.) brilliant and 2.) very difficult/messy. I was pleased to be half-wrong: the marshmallows were easy to make and everything came together pretty quickly! First, I made the outside coating for the peeps. Colored sugar is OH so difficult. 1. Start with white sugar.
2. Add food coloring.
3. Mix.
4. Mix some more.
Once your colored sugar is ready, you'll need a little bed of it for each peep. I sprayed some cooking spray on a piece of foil and put down my colored sugar:

Then it was time to make the marshmallows using a recipe courtesy of About.com. Seriously, this took maybe 30 minutes:
After giving the marshmallows a couple minutes to start to set, I sprayed a spatula and the inside of a Ziploc baggie with cooking spray. I used the spatula to fill the baggie with the soft marshmallows and then piped the peeps onto their waiting beds:
The bunny is just two lines with a small circle at the base for the head (though I think trying to get the ears on top of the head is a good goal), and a larger circle below that for the body. The chick is almost a Z shape: pipe a thick line for the body, then lift up and back over the body, then forward to end in the beak. I was afraid the peeps would devolve into shapeless blobs, but they held up really well! (You might also try putting the marshmallows into a pan to set, then using greased cookie cutters.)

Sprinkle with more colored sugar (you could also shake them in a bag full of colored sugar for better coverage, but sprinkle them first: too much exposed marshmallow will stick to the inside of . . . well, anything!):
Add some chocolate sprinkle eyes:
And have a happy Easter! Oh, and the best Peeps site ever: Peep Research. (What happens when they're subjected to a "fear chamber," AKA the microwave?) 

Monday, March 18, 2013

Best Ever Cream of Broccoli Soup


I love cream of broccoli soup and have tried for years to find one that had just the right creamy texture. This is the recipe I've been using for the past two years and it's a keeper!

Best Ever Cream of Broccoli Soup
2-3 Broccoli Heads, washed and broken into smaller pieces
9 cups water
5 Tbsp Chicken Bouillon granules
For Roux:
1 cube butter
1 onion, finely chopped
1 cup flour
2 cups whipping cream (but I have made this with milk when I didn't have cream and it still works, just maybe not as thick).

Salt and pepper to taste
2 cups shredded cheese

In a large pot over medium heat, bring water to boil and bouillon granules and broccoli, reduce heat and simmer broccoli for about 10 minutes. In a separate saucepan over medium heat prepare the roux. Melt the butter, add the onions and saute for about 5 minutes. Add the flour to the onions and stir well, forming a thick paste.

Gradually add the cream and stir until thick, using whisk for smooth texture.
Now take your broccoli mixture and blend it, pulsing a few times. I have a Blendtec so it doesn't take much and I like there still to be a few chunks of broccoli. Blend to your desired consistency or don't blend, it's up to you. Now add the broccoli mixture and the roux together and stir well. Add salt and pepper. Next add the cheese, stirring until melted. *Best tip for cheesy soups: do NOT let it boil! This will break down the cheese and it will become grainy. Just keep it on a low heat until the cheese is melted. Serve and enjoy!
This soup is great paired with my Flaky Baking Powder Biscuits.

Wednesday, March 13, 2013

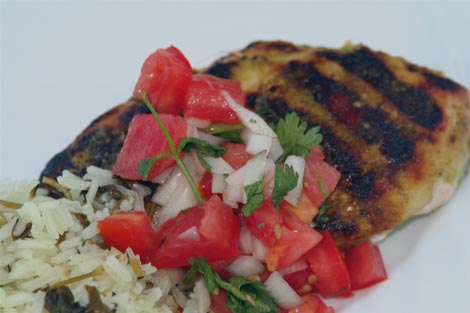
Grilled Lime Chicken


Kate here again with another recipe. I experimented with quite a few new recipes this summer so I thought I'd share one my family has been requesting again. In fact, we're having it for dinner tonight. Let's get started.
You'll need 4 bonleless, skinless chicken breasts. When I photographed this recipe, I used frozen because that's what I had. Today I used fresh.
For the marinade you'll  need:
1/3 cup of lime juice (or the juice of 3 whole limes)
5 cloves garlic, peeled
1 whole jalepeno, sliced or chunked
1 tsp. salt
1/2 cup cilantro
1/2 cup orange juice
5 T. olive oil
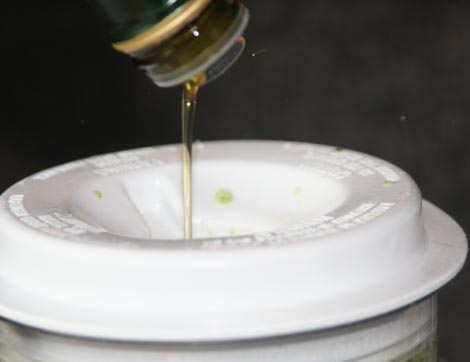
Place all marinade ingredients in blender and pulse to combine. Turn blender on and
drizzle in the olive oil. This marinade turns the most beautiful green color.
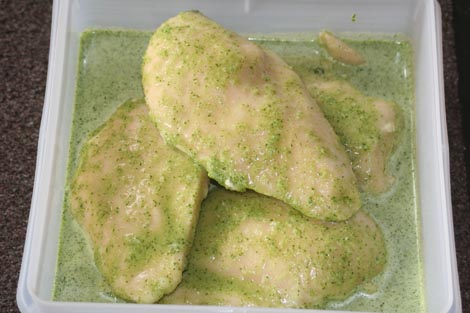
Pour the marinade over the chicken breasts. Then bring the blender close to your face and inhale. This smells heavenly. Cover and put in fridge. (If you have a gallon Ziploc bag, that would be great. It makes turning a breeze. I didn't so I used my handy dandy Tupperware. You'll want to marinate this for at least 6 hours. Remember to turn it sometime. Halfway is best, but we do what we can. Marinating overnight is better, especially if you're using frozen chicken like I did. Today mine will marinate for 6-7 hours and it will still taste great.
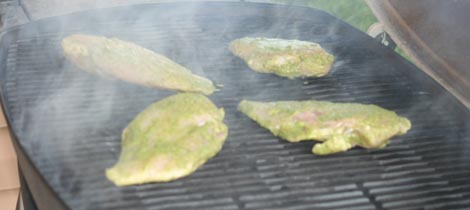
Once you're done marinating, throw the chicken breasts on the grill. I love the grill on hot summer nights when the last thing I want to do is heat up the house with the oven. (I can dream about summer can't I?) Grill on both sides until no pink remains.
I like to serve this with Cilantro-Lime Rice and Pico de Gallo. Although a black bean salad would be really good here, too. Serve and enjoy!
(I've used this marinade on shredded chicken for tacos. It gave it a fruity, light taste.)

Grilled Lime Chicken
4 boneless, skinless chicken breasts
Marinade:
1/3 cup of lime juice (or the juice of 3 whole limes)
5 cloves garlic, peeled
1 whole jalepeno, sliced or chunked
1 tsp. salt
1/2 cup cilantro
1/2 cup orange juice
5 T. olive oil

Place all marinade ingredients in blender and pulse to combine. Turn blender on and drizzle in the olive oil. Pour the marinade over the chicken breasts.  Cover and put in fridge. (If you have a gallon Ziploc bag, that would be great. It makes turning a breeze.) Marinate for at least 6 hours. Marinating overnight is better, especially if you're using frozen chicken. Turn halfway through marinating time. Grill, serve, and enjoy!


Friday, March 8, 2013

Apple Popover Pancakes

I love German Pancakes and this recipe is a twist on an old favorite. The presentation is beautiful and it tastes as good as it looks!

Apple Popover Pancakes
4 Eggs
3/4 cup flour
3/4 cup milk
1/2 tsp. salt
1/4 cup butter
2 apples thinly sliced
1/4 cup sugar
1/2 tsp. cinnamon


Slice your apples very thin so there is enough to completely line the pan. You can use a pie plate or we've also tried an 8X8 Baker.


Heat oven to 400 degrees, put pans in oven to heat up. We like to double the recipe, (but you must use two pans) so there is enough to feed our family of six (barely enough!) and it distributes the apples evenly.
Beat eggs, flour, salt, milk together for one minute. Remove pan from oven and put butter in pan.


Line your pan with sliced apples--where's the pic for this step? Ah, that would be missing because Hubs and I were talking too much and mixed up the steps. You'll see it still turned out fine!

Pour the batter over the apple slices and sprinkle with cinnamon & sugar.


Bake in 400 degree oven. Bake until golden, puffed, about 20-25 minutes.


Serve and watch it disappear quick!

Wednesday, March 6, 2013

Home made tissue tape

Hi crafty friends!
It's Kristie here from Kristie Kreates
with my monthly craft tutorial.
Today I'm going to show you just how easy it is to
 make your own tissue tape. 
There are several different names for this tape,
some call it Washi Tape, some tissue tape and some just plain crafting tape.
Whatever you call it though, it's easy to make and fun to use.
All you need is some tissue paper and double sided tape.
Here's how easy it is, cut off a piece of double sided tape and stick it onto the BACK SIDE of the tissue paper.
Using a scissors or paper cutter, cut along each side of the tape.
That's all there is to it. 
You now have tissue tape that is ready when you are.
 When you are ready to use the tissue tape, just remove the backing and stick it onto whatever project you like.

I put pieces of the tape onto white card stock,
trimmed it down and adhered it to a black card base.
 
I added a button and embroidery floss and the card was complete.
One thing you will want to keep in mind
when you use the tissue tape, is the color you apply it to. 
In this picture, you can see
 that I used it on black card stock. 
Because this is tissue tape,
 it is very thin and the black behind the tape
 will show through and change the look of the tape,
giving a very different look than
when it was applied on white card stock.
 
Thanks for stopping by today.
I hope you will try making some tissue tape
 and using it on some projects.
It's easy and it's fun.
 
I'd love to hear what you do with your tissue tape!
Leave a comment, if you will.
I'd also love for you to stop in at my blog
and see what I've been creating at
 
Until next month, have fun creating!