Friday, August 31, 2012

Reparing Broken Fruit Tree or Peach Tree Craft Rescue!

We live on a 1/4 acre lot in a small town and we have jam-packed our yard with a lot of beautiful fruit trees, berries, a garden, and a chicken coop. My husband, Steve, and I both grew up on large farming properties so our dream is to have that kind of environment for our kids.
So last week when we walked out and saw this broken branch on our lovely five-year-old peach tree, we were pretty sad. Read on and you'll see how this CRAFTY gal rescued/repaired the branch.


There was a storm brewing in the distance and we knew we needed to remedy this fast, if we wanted to save the branch. First we picked all of the softball sized peaches from the branch. They weren't quite ready, but should ripen nicely.


I should mention that my husband thinned the peaches on our tree in June, removing over 200 peaches to increase the size of the remaining peaches and to try to prevent this very problem.
I think our peaches were just too large, beautiful, and tasty. That and we're learning as we go with our backyard orchard.

I had supported the branch earlier with 4X4's and twine, but the fruit was just too heavy and the branch found its breaking point. Luckily, this was just a split branch and still had a lot of fibers holding the branch together.

As I mentioned, there was a storm approaching and I didn't have time to go research how to rescue a peach tree, but I did have a bit of crafting inspiration. My hubby wondered if we should just cut off the branch, and I said, "No, let me try to save it!"
So I thought for a minute and then pulled out my handy Stampin' Up! Twill Tape and went to work. I know you can laugh, but this crafting Mama has learned the art of improvisation!

I wrapped the twill tape carefully around the branch while Steve held it in place.
 
 Secured it with a handy bit of duct tape and put a support under the branch.


 A few days later, the wind blew the support out from the branch, but you'll see that it is holding steady.


The branch is still alive with glossy, green leaves and we have now harvested about 4 boxes of fruit from this one tree.
We're hoping with some careful pruning next year, the branch will be strong enough to hold more fruit. I'll have to take some pictures in a few months when I take the twill tape off the branch!
And I have had time to google a few fixes for broken fruit tree limbs. Here's one article: http://www.ehow.com/how_7561182_repair-broken-apple-tree-branch.html
For not knowing what I was doing, it turned out pretty good, I guess.
What do you think? Are you ready for a few peachy recipes?

Monday, August 27, 2012

Reusable Lunchbox Napkins Tutorial

For readers of RachelleWrites.blogspot.com, I'll be pulling some of my tutorials over here to my new crafting website! I'm excited about having a central place for all my crafting and recipe goodness!

Two of my four children are now in school all day and that means lots of lunches, especially for my one who is a selective eater, to put it nicely.
I thought it would be fun to make some napkins for my girls.
I ran over to JoAnn's fabric and picked up 1/4 yard each of three different cotton fabrics. This was enough fabric to make six napkins and have a little bit of fabric left over.

 
Then I decided on the size of napkin I wanted, about 8 x 8 inches, and began cutting. You can do a larger napkin if you like, but this size is perfect for kids.

I cut each square 8 1/2" x 8 1/2" to allow for seams.

Then I put two squares right sides together.

I picked a plain Jane thread to stitch right sides together and then additional thread for top-stitching that would coordinate, but also stand out as an accent.

Start in the middle of your square and stitch around all sides, stopping about three inches before you meet up with your starting point. This leaves a hole to turn the napkin and it's handy because then the hole isn't on the corner.
 Press the napkins after you turn. I hate to iron, but I'm telling you, you can't skip this step. Iron our the seams flat and tight and then get ready to top-stitch.

No need to hand stitch the hole closed! Just top-stitch around the entire napkin with your cute accent thread and Voila! your napkin is finished and the turning hole is stitched neatly shut.

My girls were excited about their napkins. They were a little concerned about getting them dirty, until I explained to them that these are napkins we'll use again and again. Just throw them in the laundry when you unpack your lunchbox.

I told them, Every time you use your napkin, you can think, "My mom loves me!"

Saturday, August 25, 2012

Spoon Bugs for Kids

Need a crafty activity to deal with those back-to-school bugs? We have just the thing!
I needed a break from the diva wedding I'm planning, so I helped Rachelle and her mom with her crafty Grandma activities!

SPOON BUGS--I know-- can't we come up with a more clever name than that?


 All you need is a little Plaster of Paris, plastic spoons, paint, toothpicks, or other accessories. Mix up your plaster with a bit of water, pat a blob into a plastic spoon. We grabbed a plastic soup spoon, regular, and dessert spoon so the kids could have a Daddy, Mommy, and baby bug.

Then we cut colored toothpicks and let the kids put legs and/or antennae on their bugs. That was a little tricky and I should have got a picture, but you have to think upside-down because the plaster of paris needs to dry in the spoon, so the little legs were sticking up and the antennae were pointing down.

After the spoons were arranged, we set to work waiting for them to dry....

It takes about 3-4 hours.

Mr. D took a break to hold the baby kitty. Oops, not like that!


Okay, that's better . . .


Once the plaster is dry, gently pop the bugs out of the spoons.
The kids absolutely loved their bugs! They couldn't wait for them to dry, so that they could start painting.
We used little foam brushes and different sized paintbrushes and let the kids go to work on the patio, painting to their hearts content.
The finished product was picture-worthy and the girls immediately set to work making a home for their bugs.
What do you think? Let's have a SPOON BUG PARTY!

Friday, August 24, 2012

Farm Girl Sunset

Would you like to see the beautiful area that Adri and Rachelle grew up in and where the Pyper's and Rachelle's parents still reside?
Take a look at a little bit of what makes us farm girls--Rupert, Idaho.

A gorgeous sunset from Rachelle's parent's backyard. She visited in July.
 There was a lot of smoke in the air from wildfires, so the sun was incredibly red.


We have a soft spot in our heart for that pivot with sprinklers going--brings back so many memories.
Guess what? Rachelle used to move pipe in that very field. She moved wheel lines and some handlines with the neighbor. After they graduated and moved on, they were replaced with a pivot!

We're thankful for beautiful things--simple wonders, like a sunset that God has given us.
Have a wonderful week!


Thursday, August 23, 2012

Whole Wheat Blender Pancakes

It's time for a recipe from Rachelle's kitchen!
I'll admit that I'm a little bit of a self-proclaimed health-nut in training. Over the past three years I've tried several things to help my family be a little more healthy. We have a long ways to go, but I figure every little bit helps. Eating is the biggest problem. I feel like we put so much junk into our bodies, so many refined sugars, flours, preservatives, chemicals, hormones--it's enough to make me wish I didn't have to eat!

My ideal goal would be to prepare foods as close to their whole state as possible, since that's when they contain the most nutrients. They're still alive at that state. It's very hard to do with most things, but like I said, every little bit helps and I'm not going to stress over it. So I wanted to share one of our favorite recipes of late. It probably still isn't perfectly healthy, but I think it comes pretty close. About once a week, I make whole wheat blender pancakes.

 Don't cringe just because it says whole wheat! Try them! They are absolutely delicious. I love the nutty texture the whole wheat provides. My kids devour them. In fact, we like to have a breakfast night once a week and when I make these my  kids can almost eat as much as my husband and I. We like to eat them with fresh fruit and berries. They are so quick and easy to make. I'd love to hear your success story if you try them and about any other great healthy recipes you love.

Whole Wheat Buttermilk Blender Pancakes 
1 1/2 cups buttermilk (or can just use milk with a teaspoon of vinegar)
1 cup whole wheat
2 heaping tablespoons cornmeal
2 tablespoons butter
1 egg (Farm fresh courtesy of our backyard chickens!)
1/4 teaspoon salt
1 tablespoon brown sugar
1 tablespoon baking powder
1/4 teaspoon soda

 In blender, mix buttermilk and wheat kernels on high for 3 minutes Add cornmeal, butter, egg, salt, and brown sugar. Blend for 10 seconds. Add baking powder and soda. Pulse 3 times and let mix foam up and get light ( about 3 minutes sitting). Batter will be chunky from the whole wheat kernels. Cook at once on a hot 375 degree nonstick griddle. Turn once.

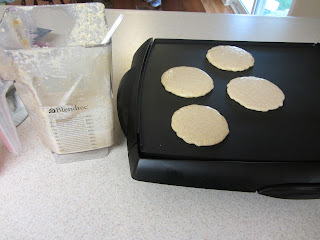
I used my Blendtec this morning and started it out on the Grind Grain option--I only ran this for about 20 seconds instead of the 3 minutes required for my regular blender.

You'll see from the picture that the batter appears different than your regular ol' store bought mix. The whole wheat kernels make it seem a bit grainy and the mixture is a bit runny, but don't add anything!

Pour it on your hot griddle and watch as the pancakes plump up nicely!
 They do take a bit longer to cook, so don't be impatient. Wait until you see the bubbles popping up all over the surface of the pancake before you flip them. They will be a delicious golden brown color.

That's it! Serve them up with fresh berries and whipped cream, yogurt, or a bit of real maple syrup. We like to make homemade berry syrup in our Blendtec, guess I'll have to share that recipe next!

You tell me--do you think my baby liked his pancakes?

Wednesday, August 22, 2012

Win a Kindle Fire, Nook, or other Ereader

Woo hoo! Our first giveaway here on Mashed Potatoes and Crafts!
We teamed up with http://iamareadernotawriter.blogspot.com/ to celebrate. One lucky winner will receive a gift certificate you can use to purchase a Kindle Fire, Nook Tablet OR another ereader of your choice up to $200!
Ereader Giveaway Participants
  1. A Book Lovers Review
  2. BookHounds
  3. Bookitty Blog
  4. Lauries Thoughts & Reviews
  5. Book of Secrets
  6. Stuck in Books
  7. Lisa's Loves (Books of Course)
  8. Reviews by Martha's Bookshelf
  9. Fire & Ice 
  10. Good Choice Reading 
  11. There's a Book
  12. Helen Smith
  13. alchemyofscrawl
  14. Bookworm Lisa
  15. Living Learning Loving Life
  16. Mashed Potatoes & Crafts
  17. Mostly YA Book Obsessed
  18. Kelly's Lucky You
  19. Dark & Dreamy with C.C. Marks
Enter away! And if you want, tell us about some great reads you're going to put on your new ereader!

a Rafflecopter giveaway
 

Monday, August 20, 2012

Lovin' the Mini Cards

Making handmade cards is so much fun and I adore creating cards with rubber stamps.

Whenever I visit my mom in Idaho, I pack a bag of Stampin' Up! supplies and we make cards in between all of our other projects.
 Here is a sampling from my visit in July.


I am in love with mini cards.

Why?

How many times have you needed a cute card for a wedding or birthday, but you don't know what to say to fill up that big space?

Either write really big or leave lots of white space. I put a regular sized card next to the minis so that you can see how cute and small they are.

With these mini cards, I don't have to feel lame when I give a wedding gift. I just put one in the gift sack for a reception and wrote, Best wishes and Happy Kisses! Congrats!

I'm excited to share more of my cards with you and would love to hear your ideas as well!
Keep on Mashing! 

Tuesday, August 14, 2012

Duct Tape Crafting

Who doesn't love Duct Tape? Now it comes in every color of the rainbow and crazy-fun patterns. I've seen people making duct tape purses, clothes, you name it!
 While visiting good ol' Rupert, Idaho (my homeland!) I tried my hand at a little duct tape design. My niece Bryn wanted a house for her teeny-tiny dolls so my mom and I whipped out some pink duct tape and reshaped a cardboard box.
There's really not much brain work involved here--just cut pieces of tape and wrap them around the cardboard, tape together two sides in a point for the roof. Okay, the flower is a bit of creative spice, but Mom came up with that one. Cut pieces of tape into flower petal shapes and attach them to each other in a spiraling pattern.
 I think it looks pretty snazzy and we even colored in the back of the cardboard house for the dollies.
 Then we made a little box for Bryn's miniature tea set.
 She loved her PINK surprises and we all had a lovely tea party with the dollies--shoulda got a picture of that!
Share your duct tape treasures with us here or on our FB page http://www.facebook.com/MashedPotatoesAndCrafts.
We put this one up on our Pinterest Board
http://pinterest.com/mashedcrafts/
What do you think?

Monday, August 6, 2012

How to Harvest Broccoli

Our very first Mashed Potatoes and Crafts video tutorial by our resident gardener, Rachelle Christensen.

What is your favorite way to eat broccoli?

Wednesday, August 1, 2012

Liability Disclosures and Policy


This policy is valid from 29 January 2013

 This blog is a collaborative blog written by a group of individuals. This blog accepts forms of cash advertising, sponsorship, paid insertions or other forms of compensation.

 The compensation received may influence the advertising content, topics or posts made in this blog. That content, advertising space or post may not always be identified as paid or sponsored content.

 The owner(s) of this blog is not compensated to provide opinion on products, services, websites and various other topics. The views and opinions expressed on this blog are purely the blog owners. If we claim or appear to be experts on a certain topic or product or service area, we will only endorse products or services that we believe, based on our expertise, are worthy of such endorsement. Any product claim, statistic, quote or other representation about a product or service should be verified with the manufacturer or provider.

 This blog does not contain any content which might present a conflict of interest.

The following relates to Giveaways specifically:
Giveaway winnings fall into one of two categories.
1) A giveaway I have paid for out of my own pocket and will be shipping to the winner myself. Entrants agree that if you are the winner you receive and use the product at your own risk. Entrants agree that I will not be held accountable for anything that happens to it, that it's used for, or that happens in correlation with or as a result of using the product. I agree to ship it in an envelope/box appropriate for the object(s) and that I will mail it as soon as I am able after the winner is confirmed. The entrant agrees that if they win that I am not responsible for the prize after it is turned over to the Post Office. If the P.O. damages it or loses it, I cannot be held liable.Even if my packaging is faulty, the winner agrees that I packaged it in good faith and I will not be held liable.
2) A giveaway that is sponsored by a company or individual other than myself. In this case, the winner will likely be put in touch with the company for the purpose of claiming their prize. In some cases I may be a mediator and winner will not have contact with the company, in that case if there is a problem the winner will be put in touch with the company to work it out. Anything that happens after winning a sponsored giveaway is between the winner and the company and falls under the company's own policies. I would never knowingly accept sponsorship from a company that is dishonest or has bad customer service, but in the rare case that the company does not follow through on their end of the deal, doesn't send the winner's prize, or any other mishap, miscommunication, rudeness, accident, natural disaster, act of God, etc. happens, I'm not to be held liable. The WINNER must work it out with the company.

In the very rare case that a giveaway is sponsored, BUT the sponsor has turned the prize over to ME to mail on to the winner, this may fall under the rules and liabilities of either or both of the above two categories, depending on the situation.

Entrants agree to abide by the requirements, guidelines, and/or rules posted here and in each giveaway. If the rules are not followed or qualifications are not met, you agree that I have the right to delete unqualified comments/entries at my discretion.


To get your own policy, go to http://www.disclosurepolicy.org


Disclosure policy and info
Disclosure of Material Connection: I received one or more
of the products or services mentioned in some of my posts for free in the hope
that I would mention it on my blog.

Please note: I only recommend products or services I use personally and
believe my readers will enjoy. I am disclosing this in accordance with the
Federal Trade Commission’s 16 CFR, Part 255: “Guides Concerning the Use of
Endorsements and Testimonials in Advertising.”